Tuesday 13 December 2011

Super simple tulle bow / flower

I waxed somewhat lyrical about the joys of the tutu in my last post, however tutus really aren't all that tulle has to offer this world of crafting, goodness me no. Along with the project-of-the-37-tutus I also made 37 matching tulle hair accessories....

I've been itching to share these with somebody because they are SO unbelievably simple to make that you could easily do this with children if they are old enough to follow a few instructions... In fact the idea came to me one night as I was dozing and thinking of things I remember making as a little girl and tissue paper flowers - made by folding layers if tissue together before opening them out - emerged from my memory. "what if I made them with tulle" was my immediate thought as I was trying to think of a way to make hair accessories to match the tutus.

Oh I just HAD to try it out as soon as possible but the tulle was safely ensconced under our bed, which needs to be lifted up to access the storage underneath, and my husband was asleep and might be mildly perturbed at bring inverted suddenly in his sleep at 11.30 at night... So I waited not so patiently (and had a good deal of trouble getting to sleep that night too) desperate to try out my idea and show it to the lovely dance instructor who had entrusted me with project tutu. It not only worked but she loved them and they became a part of the whole project and those little 4-6-year-olds looked unbearably adorable in them, which is the way of little girls of course. So here is how to make one yourself ;;


Supplies needed;

  • 4 small rectangles of tulle in contrasting colours cut approximately 14 x 20cm (this is a rough guide - you could use more layers or larger/ smaller rectangles) 
  • Some yarn/ ribbon or similar
  • A hair clip or bobby pin to attach it to

Instructions

Stack the rectangles of tulle together, alternating the colours (the light is so bad at the moment that the colours look very odd in these pictures so I apologise in advance. The background is bright white paper if you can believe it!!)


Fold the stack about 2cm from the end along the shorter side.


Fold it under 2cm along the same side, then fold it over by 2cm.


 Repeat until you have a little fan of tulle. 


Securely tie the tulle fan directly in the centre using the yarn/ ribbon- you could leave it like this in a neat little bow if you wanted


At this point I like to snip the corners of the stack to make it a bit more fluffy, though this isn't essential.


Lie the bow down and pull the top layer of tulle away from the others on both sides of the bow (these pictures were taken without the corners snipped off but you get the idea!)


Continue with the remaining layers of tulle so none of the layers are lying flat together- it is now more like a flower or Pom Pom and not remotely like a bow


  Attach to your hair clip/ hair band/ hat/ brooch... Whatever you like really! You don't have to use tulle but it holds the pom pom shape better than others; you could perhaps layer the tulle with other fabrics - the possibilities are endless.

Have fun!

Monday 12 December 2011

How to make a simple knotted tutu

First I should make something clear; I love tutus. There is something so very appealing about their pretty, floaty, colourful nature that makes me adore making them. This made making 37 of them for my darling daughter and her fellow little dancers to wear for their recent dance show a bit more bearable and less of a slog than it might otherwise have been but I must confess to being pleased to get the black & white/ black & orange combo out of the way enabling me to focus on other projects... like more tutus but in different colours!

Seriously though, it's super simple to make a tutu once you know how and I'm going to add my own to the many, many tutorials out there. You don't have to do any sewing at all if you don't want to, it's that easy. Here goes!


What to buy;

First you will need to acquire elastic or ribbon for a waistband and enough tulle in your selected colours. How much tulle you will need depends on the size of the recipient and how fluffy you would like the tutu to be. For a small child you will need approximately 2-3m of tulle, for an adult sized tutu you will need 6-8m of it. Tulle usually comes in 54 inch or 60 inch widths, which is spot on for an adult tutu; for a child's tutu I would cut the tulle so it is half as wide.

I like to use at least two colours. Having a couple of similar coulours and a contrasting one adds nice depth to the tutu


Preparation;

You will need to cut the tulle into 2-3 inch wide strips. the narrower the strips the fluffier the tutu will be but if you cut the strips less than 2 inches wide it won't really make a difference other than being more time consuming.

If you are using elastic as a waistband fasten it in a circle so that it fits snugly around the waist, stretching only very slightly. You can knot it or sew it just make sure it is securely fastened and will not come undone. If you use ribbon as a waistband mark the waist measurement lightly on the ribbon so you know what size you are aiming for (this could be by tying a bit of thread around it in two places) making sure you have a reasonable length on either end for tying the tutu on. tie in a bow just beyond the marks.

I usually find the best place to put the waistband while I am attaching the strips of tulle is on the legs of a chair that is resting upside-down on another chair. A chair back will also do - the waistband needs to be held slightly taut.


Assembling the tutu

Hold one strip of tulle in the middle, with the ends together.
Fold the middle of the tulle over & behind the waistband.
Thread both ends through the loop formed by the middle of the strip.
Pull the ends until the loop is tight around the waistband.
This sounds more complicated than it is - it's really simple - so I've made a couple of (very!) simple diagrams to clarify what I mean - the movement of the middle of the tulle is shown by green & the ends by red.....


& this is the strip pulled tight;
 You can see why I have had to illustrate this; the pictures I took to try to clarify it didn't really help!


Repeat these steps with your different colours (try out different combinations of your colour choices over a smaller area until you are happy with your pattern) until the entire waistband is covered by knots of tulle. Then squash them together and add a few more strips! When it is finished the tutu should look something like this;


If you have used ribbon as a waistband knot the ends of the ribbon around the tulle knots at the very end so that they don't slip off and you are done; easy peasy!

have fun!

Wednesday 7 December 2011

Salt dough decorations

Wow it's the 7th of December already! I have been crocheting and felting away in my spare time like a busy little bee and have made Lyra a pretty hat, an e-reader cover for my dad, a couple of felted brooches and more significantly some absolutely stunning salt-dough decorations with my children. It's amazing how something so simple can be so effective and give us all so much pleasure. Though there are countless tutorials out there here's my contribution;

Ingredients;

1 cup table salt
2 cups plain flour
1 cup cold water


Preheat the oven to a very low heat; 100-125*C

1. Mix the flour and salt together in a bowl

2. Add the water gradually, mixing as you go, until the mix forms a soft dough. If its a bit sticky don't panic just add a little more flour until it looks right; a soft, smooth dough that you can knead. I don't usually usa all of the water.

3. Roll out on a floured surface until it is even and about half a centimetre thick and cut into festive shapes. Lay these out on a baking tray

4. Place in the oven and bake for 3 to 3.5 hours until they are dried out. Leave to cool.
5. Decorate in beautiful colours, using ample glitter and sequins. Leave to dry.
6. To make the decorations last longer you can laquer or varnish the decorations. They can keep for years this way if you store them in a dry place.


And here you can see the finished masterpieces my lovely family made;


Monday 28 November 2011

November...

Well I can barely believe that this month is rapidly approaching its end... & I have barely started the whole business of making things for Christmas presents; my 2-year-old Logan has the Viking helmet & mini Viking from the previous post, I have felted a toadstool brooch for my sister and I have done the complicated bit of a crochet hat for Lyra; my 4-year-old princess. She wants me to make her a Rapunzel tower... How?! It may need to be a birthday present as I still have presents to make for my other sister, her boyfriend and my parents. The Sew Mama Sew Handmade Holidays lists are a wealth of information & ideas for this; I just hope I can get as much made as I would like to. I also have a tutu to make for my best friend and a matching (but different colour!) Viking hat for her little boy who is Logan's friend; the tutu shouldn't take long; I just need to get the tulle & get myself sorted. I wonder if I should be setting myself targets?! OK I'll try to get the tulle ordered tomorrow morning & will aim to finish Lyra's hat tomorrow night... Then I'll aim to get fabric cut out for one of my sewn present (possibly e-reader cover for dad first) by the end of the week so I can sew it together this weekend... Pictures to follow!

Friday 25 November 2011

When life became very busy and other excuses..

My little girl has started school! You would have thought that this would leave me more free time wouldn't you but apparently the reverse is true; I am now the Chair of my son's preschool committee & this is hugely time consuming as is the making of 37 tutus for my daughter's Christmas ballet show (hurrah I finally finished last week!) and the general stuff of life with a young family that I'm sure a lot of you can sympathise with.
So enough of the excuses; I'm just going to share a few photos of some of the things I have made since I last updated....
a needlefelted mouse...

Tuesday 19 April 2011

to tutu or not to tutu...?

Hello there, I'm still here! My Facebook page has been taking a couple of orders and I am now just 17 "likes" away from 300 so I've obviously been working hard on that... I had my first order from a non-friend yesterday, which was rather exciting and very lovely :)

One of my fab friends asked me to make two tutus for her little girls to wear to a royal-wedding party, which I spent most of the day yesterday making....;; tadah!


of course it had to be red, white and blue! I'm hoping to get to the post office tomorrow so I can be certain they will arrive in time!! here's a close-up....


I have also experimented in the making of petal tutus (well... tutu singular and blossom rather than petals...!) what do you think?...;


this is made in my daughter's size and I will be posting it as a "something I can make to order" thing. The soft tulle, coloured elastic and petals do make them more expensive to make but I personally think it is a beautiful effect.....


I really should take a picture of my little princess in this but she was determined to wear it without any other clothes so not really an appropriate bloggy photo!!!


I really find making tutus rather therapeutic. You can use lots of colour and they look so fey and delicate :)


well ttfn, I have dinosaurs to finish!!


Tuesday 5 April 2011

New creations and FB page

Hello & welcome! thank you for stopping by :) I've made a couple of new pieces to sell and have been busy getting my head round the whole Facebook page thing - promoting my page and liking other pages etc... I've managed to get 43 "likers" since I set the page up yesterday so not bad progress, though I'm really hopiong to get to 100 by the end of this week, that would be lovely :) The two makes I haven't shared yet (because I made them yesterday!) are Ermentrude the elephant keyring, she's so teeny, just 2 inches nose to tail...... I made her whilst being climbed all over!!!!


And my own version of a heart stitch headband (inspired by mamachee's design but my own pattern)


the elastic stops it flipping your hair up at the back!


Please come and visit my page and have a browse, or make a comment here! you'd make my day :)


ttfn

Monday 4 April 2011

A dramatic weekend and my new Facebook page!


The peace of my Friday (and any plans!) were rather dramatically shattered by my little boy suddenly becoming very poorly and being admitted to hospital in the afternoon with breathing problems. Fortunately he was allowed home late that night and seems to be more himself now but I have obviously had other things on my mind than crochet!!

However, I have still managed to make a minion from the movie Despicable Me ;


and a baby seal this weekend


and this morning set up a page on Facebook to share and sell my little creations so please pop by and "like" me if you are on Facebook :)


ttfn!

Thursday 31 March 2011

Building up stock

Hello, hello; just a quick one today as I'm about to take a small boy to playgroup! I've mentioned before that I set up an Etsy shop last year, however it is looking rather empty and sorry for itself at the moment so I really need to do something about it! I've decided I need to build up a decent amount of stock first so that I can really show what I can do so I started yesterday by making this little cutie; Watermelon the baby dragon :) What do you think? he's really very sweet and (as with all of my toys) he was made without a pattern so I'm rather pleased with how dragonish he turned out.... & bless his little paws he's only 2 inches high, awwww!

Grrr!


I also made a bit of progress on a birthday present for my hubby but as I spent more time planning and browsing online for inspiration I have done mor plotting than hooking! However do watch this space...


Incidentally how much would you expect to pay for someone like Watermelon?


ttfn x

Tuesday 29 March 2011

Crochet goddesses of Blogland...


As you may gather from my blog I love crochet. Though I tend to either completely design my own patterns for projects or adapt patterns to my own designs I get a huge amount of inspiration from browsing online...


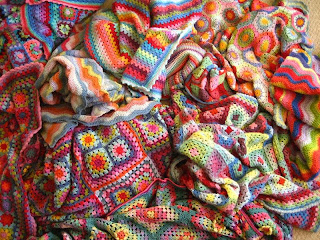
Lucy at Attic24 has become something of a legend in the online crochet world for her amazing eye for colour, which she applies to the beautiful patterns she makes. Her blankets in particular are absolutely stunning and she has some excellent patterns and tutorials on her blog. This is a picture of her many glorious blankets. total eye candy;


Tara at Easy (aka Mamachee) has designed masses of patterns that are adorable and fun in equal amounts, some of which are available on her blog and some that you can buy in her etsy shop. The picture shows her "I heart U" hat/headband; I have designed my own version of this idea without having seen the pattern but I only worked it out looking at this picture;


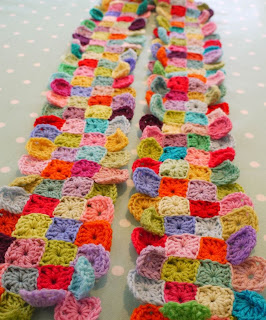
Vanessa at Do You Mind if I Knit? has her a style of work that is very distinctive. Her creations (crochet, knit, paintings, papier mache.... she has many talents! In fact my daughter's very favourite book is illustrated by her.) are beautiful and she has some marvellously clear tutorials. Her two dogs are pretty darned cute too! This is her gorgeous "designer" style scarf, which she has created a quick pattern for;


Finally June from PlanetJune has created some of the most stunning amigurumi that I have ever seen. They are seriously fabulous and I would just love to have time to make them all! These are the easter themed patterns she has made, very seasonal!


I hope you've enjoyed this little peep into my blog reading! do you have a favourite that I might like too?