Showing posts with label tutorial. Show all posts

Monday, 12 December 2011

How to make a simple knotted tutu

First I should make something clear; I love tutus. There is something so very appealing about their pretty, floaty, colourful nature that makes me adore making them. This made making 37 of them for my darling daughter and her fellow little dancers to wear for their recent dance show a bit more bearable and less of a slog than it might otherwise have been but I must confess to being pleased to get the black & white/ black & orange combo out of the way enabling me to focus on other projects... like more tutus but in different colours!

Seriously though, it's super simple to make a tutu once you know how and I'm going to add my own to the many, many tutorials out there. You don't have to do any sewing at all if you don't want to, it's that easy. Here goes!


What to buy;

First you will need to acquire elastic or ribbon for a waistband and enough tulle in your selected colours. How much tulle you will need depends on the size of the recipient and how fluffy you would like the tutu to be. For a small child you will need approximately 2-3m of tulle, for an adult sized tutu you will need 6-8m of it. Tulle usually comes in 54 inch or 60 inch widths, which is spot on for an adult tutu; for a child's tutu I would cut the tulle so it is half as wide.

I like to use at least two colours. Having a couple of similar coulours and a contrasting one adds nice depth to the tutu


Preparation;

You will need to cut the tulle into 2-3 inch wide strips. the narrower the strips the fluffier the tutu will be but if you cut the strips less than 2 inches wide it won't really make a difference other than being more time consuming.

If you are using elastic as a waistband fasten it in a circle so that it fits snugly around the waist, stretching only very slightly. You can knot it or sew it just make sure it is securely fastened and will not come undone. If you use ribbon as a waistband mark the waist measurement lightly on the ribbon so you know what size you are aiming for (this could be by tying a bit of thread around it in two places) making sure you have a reasonable length on either end for tying the tutu on. tie in a bow just beyond the marks.

I usually find the best place to put the waistband while I am attaching the strips of tulle is on the legs of a chair that is resting upside-down on another chair. A chair back will also do - the waistband needs to be held slightly taut.


Assembling the tutu

Hold one strip of tulle in the middle, with the ends together.
Fold the middle of the tulle over & behind the waistband.
Thread both ends through the loop formed by the middle of the strip.
Pull the ends until the loop is tight around the waistband.
This sounds more complicated than it is - it's really simple - so I've made a couple of (very!) simple diagrams to clarify what I mean - the movement of the middle of the tulle is shown by green & the ends by red.....


& this is the strip pulled tight;
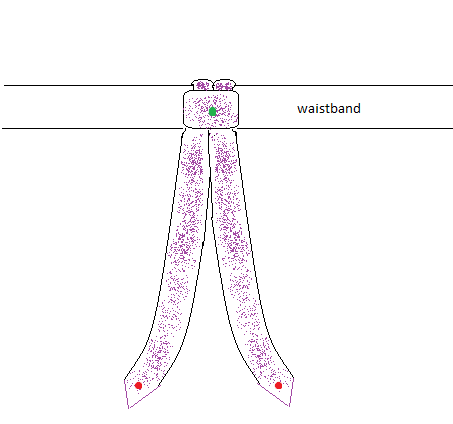
 You can see why I have had to illustrate this; the pictures I took to try to clarify it didn't really help!


Repeat these steps with your different colours (try out different combinations of your colour choices over a smaller area until you are happy with your pattern) until the entire waistband is covered by knots of tulle. Then squash them together and add a few more strips! When it is finished the tutu should look something like this;


If you have used ribbon as a waistband knot the ends of the ribbon around the tulle knots at the very end so that they don't slip off and you are done; easy peasy!

have fun!

Wednesday, 7 December 2011

Salt dough decorations

Wow it's the 7th of December already! I have been crocheting and felting away in my spare time like a busy little bee and have made Lyra a pretty hat, an e-reader cover for my dad, a couple of felted brooches and more significantly some absolutely stunning salt-dough decorations with my children. It's amazing how something so simple can be so effective and give us all so much pleasure. Though there are countless tutorials out there here's my contribution;

Ingredients;

1 cup table salt
2 cups plain flour
1 cup cold water


Preheat the oven to a very low heat; 100-125*C

1. Mix the flour and salt together in a bowl

2. Add the water gradually, mixing as you go, until the mix forms a soft dough. If its a bit sticky don't panic just add a little more flour until it looks right; a soft, smooth dough that you can knead. I don't usually usa all of the water.

3. Roll out on a floured surface until it is even and about half a centimetre thick and cut into festive shapes. Lay these out on a baking tray

4. Place in the oven and bake for 3 to 3.5 hours until they are dried out. Leave to cool.
5. Decorate in beautiful colours, using ample glitter and sequins. Leave to dry.
6. To make the decorations last longer you can laquer or varnish the decorations. They can keep for years this way if you store them in a dry place.


And here you can see the finished masterpieces my lovely family made;


Wednesday, 25 November 2009

Pig crochet pattern

This little piggy is very quick & easy to make. I made the pattern up as I went as part of a crochet farm for my son & really enjoy making them so expect he'll end up with a whole litter.. I've had so many lovely comments I decided I'd share how I do it.
I've had this pattern mostly written up for about 3 weeks now and have only just had the opportunity to finish it off. I haven't fully tested it but did write while I crocheted & have made it several times. This is the first pattern I've written so I hope it's clear enough & there are no mistakes! Please comment & let me know if I need to make anything clear or if you use it to make your own little piggy :o) I'll add more pictures & test the pattern as soon as I can.

The pattern is worked in the round starting at the nose. The row/round number is at the start & number of stitches in each round is in (brackets) at the end
Abbreviations used;
sc = single crochet (I use US terms so where I say sc I mean a UK
double crochet)
sc2tog = crochet 2 single crochet stitches together decreasing by one stitch.
2sc = make 2 single crochet stitches in one stitch
St = stitch
Sl st = slip stitch
Ch = chain
rep = repeat

Main body; snout to tail

1. Magic ring 6 st (this is dead simple once you can do it but if not ch3, attach in a circle with a sl st & 2sc in each st to get a 6st circle)

2. Sc in each st only inserting the hook throught the loop on the wrong side of your work. (leaving the loop free on the side that will show gives a clearer line around the snout)

3. Sc in each st. & join with a sl st (6)

4. Sc in first 2 st then 2sc in each st. To end (10)

5.
Sc in first 2 st then *sc 2sc sc* rep between ** to end (14)

6.
Sc in first 2 st then *sc, sc, 2sc, sc* rep between ** to end (18)

7.
Sc in first 2 st then *sc,sc,2sc,sc,sc* rep between ** to end (22)

8.
Sc in all (22)

9.
Sc 8, *ch4, in 4ch; sc in 2nd ch From hook, hdc, hdc, join to same st with a sl st* sc6, rep **, sc8 (22)

Rounds 10 to 17. Sc all (22)

18.
2sc *Sc, sc2tog, sc* rep ** to end (18)

19
. *Sc, sc2tog* rep to end (12)

20
. sc2tog to end (6) join with sl st & tie, leaving a long tail to close end

Stuff the body & use a yarn needle to close the hole making sure each
stitch is picked up. Tie at the top of the now closed hole, tie a knot
in the end of the yarn; this is the tail.

Legs (make 4)

1.
Magic ring 6 st

2. Sc in each st only inserting the hook throught the loop on the wrong side. (gives A clearer line around the edge)

3.
Sc in each st. (6) Sl st, bind off leaving a tail long enough to attach to body

Attach legs to body using a yarn darning needle. The front legs should be attached under the body with the front about in line with the ears. The back of the back legs should be in line with the last row before you began to reduce stitches.

NB. When attaching the legs (or other appropriate body parts for different projects!) I find I get a neater result by pushing the needle up through the stitch on the body (in the gap, never through the yarn) threading it through both loops of the stitch on the edge of the leg and then back into the same gap on the body. Does that make sense?! If you use two "holes" it just doesn't seem so neat in my experience.

Enjoy :o)